|
Launch Pad Construction -
Cutting Parts
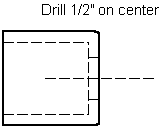
(2) Drill a 1/2" hole in the center of one 1/2" PVC slip
cap. Some caps are rounded on the end. For rounded caps, start
drilling from the inside so that the drill bit will self-center.
Clean the burrs off on the inside and outside. Test fit the tire
valve to make sure it fits snug inside the hole. Reem the hole if
necessary a little larger. Don't make it so large that the tire valve
slips with no effort. If the tire valve has a hole size on the
package then try to find a drill bit that size.
(3) Cut a 1" long segment of a 7/8" ID rubber hose. This is
used with the 1" hose clamp to hold the compressed spring when
locking down the handle.
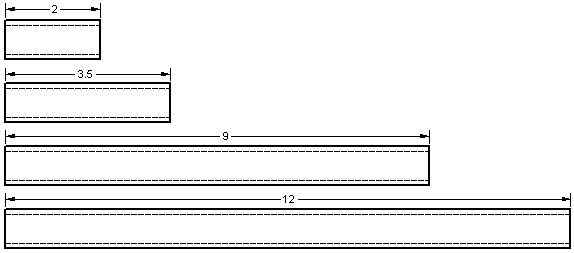
(5, 6, 11, 15) Cut 1/2" Sched. 40 PVC into the following segments:
(5) 2 pieces - 2" length,
(6) 2 pieces - 3 1/2" length,
(11) 1 piece - 9" length, and
(15) 4 pieces - 12" length
If you purchase 10ft lengths of PVC, you can cut them up for
production in the parking lot and toss the segments into the trunk.
That is better for people like me that have a small car and no pickup truck.
(7)a. Take the 9" length of Sched 40 PVC and drill the inside
with a 5/8" auger bit to a depth of 2" on one end.
The auger bit will be a tight fit but it will insert into the end if
you squeeze the PVC with pliers.
(7)b. Glue the 9" Sched 40 PVC piece into the 1/2" PVC Slip
coupler. Glue the end in that has been drilled out.
(7)c. Cut the Sched 40 PVC off right at the 1/2" PVC Slip
coupler. File the end flat and smooth with the flat file. Be carefull
to keep the surface square and flat.
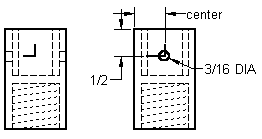
(7)d - (8). Drill one hole, straight through the center, 1/2"
from then end of the 1/2" PVC Slip coupler. If you don't have a
drill press, mark both holes and hand drill them separately for more
accuracy. Start the 1/4-20 tap in one whole and cut only 2 threads
into the hole. Don't tap the entire hole because the removal of too
much material makes a poor seal around the bolt. A tap is necessary
to gaurentee starting the bolt without stripping out the hole.
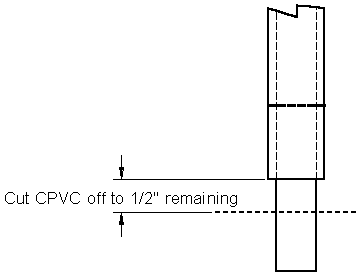
(9) Glue CPVC inside the drilled end of the 1/2" Schedule 40
PVC. It will push in easier until the depth of the reem out has been
reached. Wipe off excess glue. Cut the CPVC off to 1/2"
remaining past the end of the Sched 40 PVC.
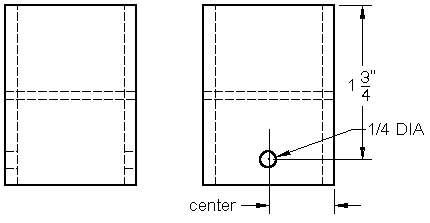
(10) Drill one hole using the 1/4 bit, straight through the center,
3/8" from then end of the 1 1/2" PVC Slip coupler. If you
don't have a drill press, mark both holes and hand drill them
separately for more accuracy.
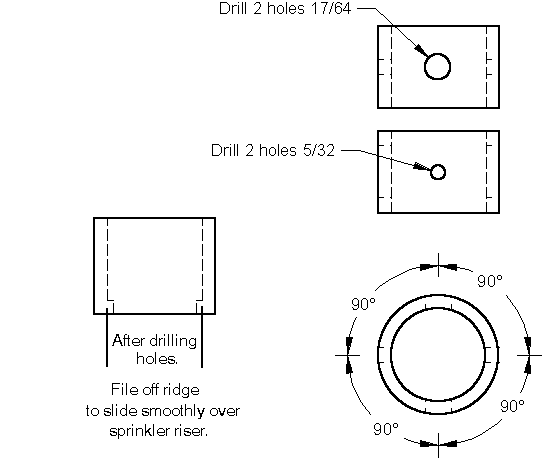
(1) Mark 4 holes equal distances around the 3/4" - 1"
copper pipe adaptor bushing, and center them in the length. Drill two
holes on opposite sides of the bushing with the 5/32 bit. Drill two
more holes 90 degress from the first two holes with the 17/64 bit.
There should be 4 holes 90 degrees apart alternating small and large.
Tap the small holes with the #10 -24 tap and the large holes with the
5/16-18 tap. You can use a reversable, variable speed drill to tap
the holes. Just be carefull not to stip the holes. The bushing may
have an internal ridge that needs cleaning off along with the
drilling and tapping burrs. If it does, file off the ridge after
drilling and tapping. Use the round file to smooth the interior and
possibly a piece of sand paper to smooth the filing marks.
(4) Cut then end off of the 1/2" Sched 40 PVC slip plug.
This piece must be cut with a hack saw. The PVC used for the plug is
brittle and easily shatters the wrong way if you use a pipe cutter.
Clean the burrs off the small part.
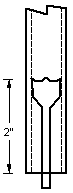
(12) Print a handle pattern out of sturdy
paper. Download and open the image provided in an image editor and
change the page settings so the boarder is 1/2" all around for 8
1/2" x 11" paper. Other size papers you might have to scale
differently to make the image 7.5" x 10". Cut the handle
patter out and hole punch out the holes.
You may have to make a pattern if you can't print to scale. Start at
the end of the 2" PVC pipe and make a center line down the side.
Make the 1/4" hole mark about 3/8" from the end on the
center line. Mark the second hole 2" down the center line and
1/16" offset to one side of the center line. Important: the
offset holes must be offset to the same side of the pipe. If you mark
the first hole as shown below to the left of the center line, then
the opposite hole must be offset to the right of the center line.
Then draw the curve of the handle approximating the shape given in
the picture.
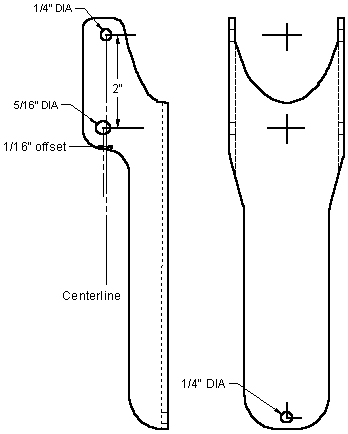
Layout the handle pattern on the 2" PVC pipe and mark the
outline and the hole centers.
Drill the holes first. Then cut the patterns out with a jigsaw. Be
sure to rotate the piece under the jigsaw while cutting so the blade
remains in the center of the pipe. The standard jigsaw blade will fit
inside the 2" pipe without bumping the other side as you saw.
PREV<< Parts List NEXT>> Parts Gluing
Table of Contents
|