The only bad question is the one never asked.
Launch Pad Demonstration Video
Launch Pad Assembly Video
Index
When I put the bottle on the launcher, should we pour the water into the tube or try to keep it in the bottle?
Where does the gasket go?
My bottle doesn't seal. What now?
Do I need the options for the launch pad?
You can probably help us a bit over here...the rockets tend
to "corkscrew" and then go horizontal...any suggestions?
My PVC pipe broke. How can it be repaired?
I've had to repair my launch pad, how do you adjust it?
The launch tube with gasket fits very snugly into a 2-liter bottle, and I'm wondering...will the tube stay inside the bottle when it's launched?
I reread the sheet and it says the launch tube is optional. Comments?
How do I attach the addons purchased seperately?
Which launch pad is best for my situation, 2007 or 2008 model?
How to prevent aggressive string pulls from pulling over the launch pad?
How do I replace the bottle grabbers?
Q
I ordered 2 launchers. They arrived fine, but I have a question about how to use them. When I put the bottle on the launcher, should we pour the water into the tube or try to keep it in the bottle?
Could you explain this for me?
Thanks,
Jennifer
A
You have a couple of choices. You can put water in the bottle, then quickly flip the rocket over onto the launch tube. You loose a little water, but not much. Or, since the launch pad is not glued together at the base, you can take the launch pad off the base and insert it into the rocket while the rocket is upside down.
With a little practice, the first option isn't too difficult. However, if you're measuring the amount of water by volume or by weight for rocket science experiments, you'll probably want to use option 2 above.
Q
Where does the gasket go?
A
The launch tube has a small, yellow CPVC insert. The gasket slides over the top of the CPVC insert shouldering up against the white PVC launch tube. Then the CPVC end inserts into the top of the launch pad between the grabbers. Most are fairly stiff to insert. Push all the way in until the gasket is pressed against the top of the launch pad. See demonstration video.
Q
My bottle doesn't seal. What now?
A
Make sure you only use soda bottles. Water bottles will not seal. Water bottles are not designed to hold pressure.
If you are using a soda bottle, try to improve the seal by:
- Twist the rocket on the pad, back and forth just a little.
- Wiggle the large 1-1/4" top part of the launch pad to try and center the rocket inside.
- Depressurize, then remount the rocket.
- Replace the gasket with a new one.
- Try a different soda bottle, because not all soda bottles are the same.
If you can not get a good seal up to 100 psi, then feel free to call WaterRocketPop.com for assistance.
Q
Do I need the options for the launch pad?
Pat
A
The options are not necessary to fly rockets. The options assist with controlling two parameters of the rocket for launching: pressure and water level.
If you need repeatable pressure settings then you need a pressure gauge. However, you may already have a pressure gauge on your air compressor, air tank or bicycle pump. Repeatable pressures come in handy during a competition or when you study the effects of air pressure on rocket flights.
The garden hose adaptor comes in handy when you are near a water source. You can also make your own water source and fill rockets on the pad. Filling a rocket with water on the pad means reduced error in setting water level. If you don't have an air pump, you can use the water pressure to compress the air in the rocket and fly with only adding some water. You can get about 40 psi by adding about 1/3 water to a bottle.
Q
You can probably help us a bit over here...the rockets tend
to "corkscrew" and then go horizontal...any suggestions? Do we need
bigger fins? We have tried launching without caps and also with caps
with different size holes drilled in, but all with the same results.
Thanks,
Mark
A
I'm happy to hear you're making progress on learning rocket science. The easiest way to get more stability is to make the rocket longer. However, in your situation it appears that you have a thrust vector problem. Drilling a hole in the bottom of a rocket for the thrust requires a great deal of precision or else the thrust is angled and the rocket unstable.
The rocket is a balancing act. Out of balance thrust, or fins can make a rocket turn. The amount of turn and how fast it turns depends on its weight, length and cg/cp ratio. The center of gravity must be higher than the center of pressure in order be stable. It becomes obvious that just off the launch pad most of the weight is at the bottom of the rocket with the water. So the only way you can have stable flight with water is with balance or a large moment of inertia about the center of rotation. Fancy way of saying a long rocket. You remember merry go rounds? You move to the middle and the rotation speeds up, or to the outside and rotation slows down. Moving weight farther away from the middle of the rocket will slow down the turning. Having a centered thrust will also slow down the turning.
I have great success using CPVC by itself as a launch tube. I reem out 1/2 schedule 40 PVC pipe with a 5/8" masonry drill bit. I cut about 1" of the reemed pipe and glue it inside the throat of a soda bottle to make a reduction nozzle. The tighter the fit with the soda bottle means the better the alignment of thrust. My total altatude almost doubles.
I would suggest you might have success straigtening your thrust vector by plugging 1/2 schedule 40 PVC pipe, cutting it square on a table saw, cut a 1" piece off, then drill it on a drill press. After it is drilled with some precision you can glue it into the soda bottle ensuring a better thrust vector.
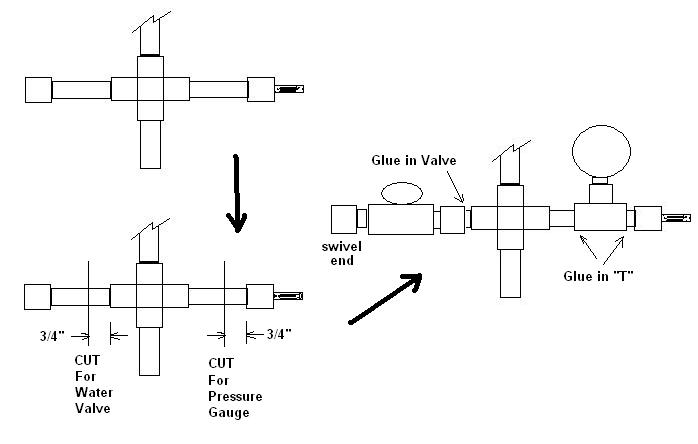
Our launch pad will accept many difference experiments with nozzle sizes and shapes. The end seal gives that opportunity. Cut a short piece of 1/2" CPVC pipe to insert into the top of the launch pad with just enough sticking out to hold the gasket in place. It is a tight fit for the CPVC however, you can sand down the pipe so that it slips in easier. If you push it down until it hits the cross bolt in the launch pad then it will stay in place for you. When you make a reduced nozzle to glue into a soda bottle, glue it in leaving room for the CPVC to poke into the bottom of the bottle. The gasket has to compress and hold pressure. Hopefully the attached picture will help.
May all your rockets go straight from now on.
Q
My PVC pipe broke. How can it be repaired?
A
Materials:
- 1/2" CPVC pipe section (at least 4")
- PVC Cleaner/Primer
- PVC Cement
- Paper Towel
Tools:
A repair joint's strength depends on the inside pipe length and the joint weld. PVC pipe gluing is not like wood glue where the joint depends on the strength of the glue. PVC glue is a softening agent so that the PVC pipes weld together. Surface preparation is the key to getting a good PVC weld.
Clean the insid of half of the broken joint. Clean the outside of the end of the CPVC pipe section. Spread glue inside the broken joint half that was just cleaned. Spread glue all around the cleaned end of the CPVC pipe. Give ita few seconds to soften the plastic, then shove the CPVC pipe into the broken PVC pipe. Immediatley wipe off excess glue.
Cut the CPVC pipe about 1" sticking out from the broken pipe. Clean the outside of the CPVC and the inside of the other broken half. Glue the inside of the other broken half and the outside of the CPVC. Give it a few seconds to soften teh plastic then shove the two broken halves back together.
Let the pipe repair cure for 12 hours before pressurizing.
Q
I've had to repair my launch pad, how do you adjust it?
A
Adjusting the Launch Pad
-
Loosen the turnbuckle lock nuts using a 3/8" open end wrench. You can hold the turnbuckle with pliers or a screwdriver so that it doesn't turn with the lock nut.
-
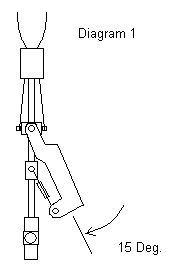
Raise the launch pad handle, insert the launch tube and gasket, mount a soda bottle and slide down the handle and soda bottle just to where resistance starts due to the gasket starting to compress. See diagram 1.
-
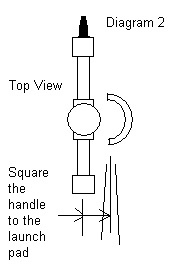
Adjust both or either turnbuckle to acheive the proper angle for the handle, and to square the handle to the launch pad cross. See diagram 2.
-
Try locking the handle down. It should be stiff, but not so hard a 10 year old couldn't lock it down. The locked down handle should be square and not rotated in respect to the launch pad cross.
-
Tighten the turnbuckle lock nuts using a 3/8" open end wrench. You can hold the turnbuckle with pliers or a screwdriver so that it doesn't turn with the lock nut.
Q
The launch tube with gasket fits very snugly into a 2-liter bottle, and I'm wondering...will the tube stay inside the bottle when it's launched?
-John
A
If you soda bottle fits too tight it is because of the extra plastic at the lip. Not all soda bottles are like that. You can just grab another soda bottle, or you can reem out the lip with a pocket knife. That usually does the trick to make it slide easier.
Normally, even a tight fitting launch tube doesn't jump out of the launch pad. But, sometimes it does. I've never seen one with much energy jumping out of the launch pad. They just seem to hop out.
Q
I reread the sheet and it says the launch tube is optional. Comments?
-John
A
The launch tube does help to hold the gasket in place. They are not required, if you use a piece of double-sided tape or something else to hold the gasket in place. Or you can use a short piece of the 1/2" CPVC (yellow pipe) about 3/4" long to just hold the gasket in place. The idea is that you can insert something into the soda bottle neck to reduce the nozzle diameter and still achieve an end seal against the gasket. Small diameter nozzles can improve performance of the rocket over the open throat soda bottles.
I believe the end seal style of launch pad is superior to internal "O-ring" seals because you can change out the nozzle diameters. The optimum nozzle diameter is unique to each rocket and the online simulators can show you, for your rocket, what is going to get you the greatest altitude.
Q
How do I attach the addons purchased seperately?
A
Use clear or purple primer to clean both sides of the joint. Apply PVC cement to both sides of the joint. Press on, rotate into position, and hold for 20 seconds. Wait at least 4 hours before pressurizing the launch pad. Waiting overnight is best.
Q
Which launch pad is best for my situation, 2007 or 2008 model?
A
The first thing to consider is ease of use. The 2007 model reaches up to grab the bottle and then pulls the bottle down against a gasket for an end seal.
The 2008 model has in internal O-ring seal and you are required to push it down over the O-ring. I would say that the 2008 is stiffer, more difficult to use. The 2007
model is easier to tell it is in place because it snaps into locked position.
The second thing to consider is the bottles you are using for rockets. The 2007 is an end seal requiring a specific thread height on the bottle. The 2007 model will not work with
some water bottles, the new Coke brand bottles with short thread height, and some other soda bottles. The 2008 model is designed to work with any bottle but there are some bottles that are
tighter on the gasket and hard to put on the pad. If you keep the 2008 launch pad greased with something like petrolium jelly, it will be fairly easy to use for almost all bottles.
The third thing to consider is how much science you want to perform. The 2007 end seal allows you to put in a CPVC launch tube instead of the PVC launch tube. If you insert a piece of PVC pipe into the rocket nozzle then you will have
reduced the nozzle diameter which increases the rockets appogee. You can also use the 2007 pad to not use a launch tube and insert something in the water rocket to reduce the nozzle even further. The 2008 launch pad pretty much only works with
soda bottles having an wide open nozzle.
Q
How to prevent aggressive string pulls from pulling over the launch pad?
A
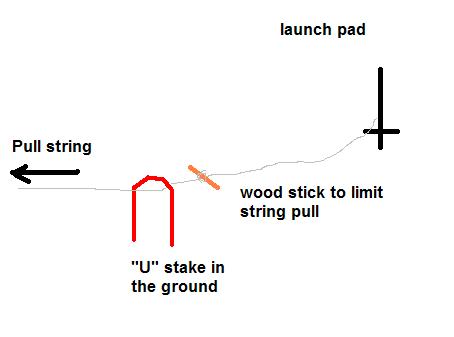
Both the 2007 and the 2008 launch pads are sturdy. However, the person pulling the launch string should not be agressively pulling the string. The launch pad can be pulled over and possibly broken at the base. The base is fairly easy to repair with CPVC fitting inside. Wes has found a way to limit the pull of the string by putting a "U" shapped metal stake in the ground and running the string under the metal. See illustration attached. He puts a wooden stick on the string so the string stops when the wooden stick reaches the metal stake.
Q
How do I replace the bottle grabbers?
A
Since the bolt heads are difficult to get to, it is easiest to cut a slot in the end of the bolts. Slots can be cut with a
hacksaw or with a Dremel (tm) tool using a cutting wheel.
You can hold the nut with a wrench. I prefer to use Vice Grips (tm). You turn the screw with a flat head
screwdriver while holding the nut. Remove the old part, cut them if it makes removal easier. Slide the new part
through the top of the pad. Sometimes you may need to push the top cup to one side to make room for the grabber bottom
loop. Or you may need to hammer the grabber bottom loop a little more flat to fit. Put the replacement grabber over the
bolt and tighten the nut back on.
Note: the Nyloc Nut (tm) has a running torque (or tightness) that keeps the nut on. Do not over-tighten the nut onto the
grabber loop. The grabber should be able to move a little. The nut should be held only by the nylon friction insert.
Q
A
|